From the FCP manual:
COMMON TYPES OF TRANSITIONS
A cut, the most basic type of transition, is a transition with no duration; when one shot ends, another one immediately begins, without any overlap. All other transitions gradually replace one shot with another; when one shot ends, another one gradually replaces it. There are three very common transitions used that occur over time: fades, cross dissolves, and wipes.
A fade-out begins with a shot at full intensity and reduces until it is gone. A fade-in begins with a shot at no intensity and increases until it is full. These are the common “fade to black” and “fade up (from black)” transitions.
A cross dissolve involves two shots. The first shot fades out while the second shot simultaneously fades in. During the cross dissolve, the two shots are superimposed as they fade.
A wipe is where the screen splits, moving from one side of the image to the other to gradually reveal the next shot. It is more obvious than a fade or cross dissolve.
Final Cut Pro also comes with two audio transitions: a +3 dB cross fade (the default) and a 0 dB cross fade Cross Fade (+3 dB): Performs the same operation as Cross Fade (0 dB), but applies an equal-power ramp to the volume level, rather than a linear ramp.
Cross Fade (0 dB): Fades the first clip out, while simultaneously fading the second clip in. This effect applies a linear ramp to the volume level. As a result, the volume level dips in the middle of the cross fade. Each cross fade results in a different audio level change as the transition plays. Your choice of cross fades depends on the clips you’re transitioning between. Try one, then try the other to see which sounds better.
Using Transitions in Your Sequences Transitions, especially dissolves, generally give the viewer an impression of a change in time or location. When very long transitions are used, they become more of a special effect, useful in creating a different atmosphere in your sequence. You can use transitions to:
- Convey the passing of time between scenes
- Fade up at the beginning of the movie or scene
- Create a montage of images
- Fade out at the end of the movie or scene
- Create motion graphic effects
- Soften jump cuts (cuts between two different parts of the same footage)
To add the default video transition, do one of the following:
- Select an edit point between two video clips or position the Canvas or Timeline playhead at the desired edit point, then press Command-T.
- Control-click an edit point between two video clips in the Timeline, then choose Add Transition from the shortcut menu. The name of the current default transition appears next to the command in the shortcut menu.
To add a transition from the Effects menu: 1 Do one of the following:
- Click an edit point between two clips in your sequence to select it.
- Position the Canvas or Timeline playhead at the desired edit point.
- Position the Canvas or Timeline playhead on a transition that’s already been edited into your sequence.
2 Do one of the following:
- Choose Effects > Video Transitions, choose the type of transition, then choose the desired transition from the submenu.
- Choose Effects > Audio Transitions, then choose the desired transition from the submenu.
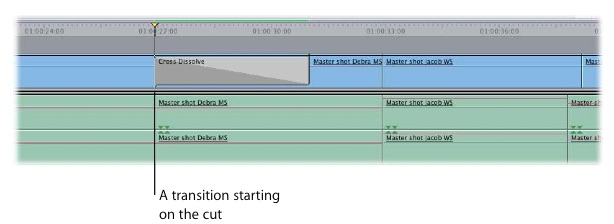
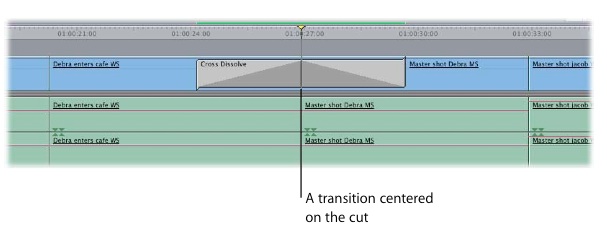
How Transitions Appear in the Timeline Transitions are applied between two adjacent clips in the same track of a sequence in the Timeline. In the Timeline, a transition is displayed as an object overlapping two adjacent clips. You can still see the cut point between the two clips. A dark gray slope in the
transition’s icon in your sequence indicates the speed, alignment, and direction of your transition.
Aligning a Transition in the Timeline You can place a transition so that it starts on, centers on, or ends on the edit point between two clips in the Timeline. You should choose a transition alignment based on the editorial effect you want to achieve:
- Starting on the cut: Choose this alignment if you want the last frame of the outgoing clip to be fully visible before the transition begins.

- Centered on the cut: Choose this alignment if you want the cut point between the two clips to be the midpoint in the transition.

- Ending on the cut: Use this alignment if you want the first frame of the incoming clip to be fully visible.
You will need to have a sufficient amount of the clip roll on to be able to add a transition. This means there will need to be enough video after the edit cut that FCP can use within the fade/transition.
Double click on the transition and it will be come viewable in the VIew window. You can edit the speed, alignment or length of the transition with more ease here.

No comments:
Post a Comment